Prerequisites
Before you begin, ensure you have:- An account and are logged in
- An organization set up
- A project created
- Permission to update the project (you have this if you’re the project creator or admin)
What is the Playground?
The Playground helps you:- Test your chat agent by having real conversations with it
- Edit prompts and see how changes affect responses
- Adjust AI settings like model, temperature, and tools
- Experiment safely without affecting your live chat agent
- Save changes to your project when you’re satisfied
The Playground uses your project’s current settings but allows you to test custom configurations before saving them.
Access the Playground
Navigate to your project
After logging in, go to the Projects page from the main navigation. Find and click on the project you want to test. You’ll be taken to the project dashboard.
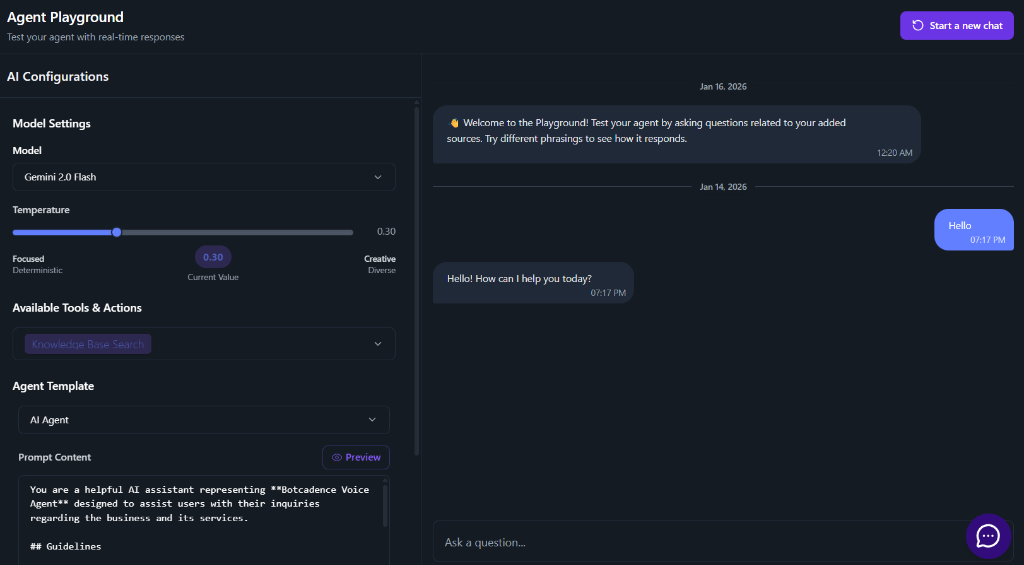
Understanding the Playground Interface
The Playground is divided into two main sections:Left Panel: Configuration
This panel lets you:- Select and edit prompt templates
- Adjust AI model settings
- Configure tools and actions
- Save your changes
Right Panel: Chat Interface
This panel shows:- Your conversation with the chat agent
- Messages you send and responses you receive
- Real-time testing of your configurations
Test Your Chat Agent
Start a conversation
Once the Playground loads, you’ll see a welcome message. Type a question or message in the input field at the bottom of the chat interface. For example, try asking: “What can you help me with?”
Send your message
Click the send button or press Enter to send your message. The chat agent will respond based on your current prompt and AI settings.
Review the response
Read the chat agent’s response carefully. Consider:
- Does it answer your question correctly?
- Is the tone appropriate?
- Does it use information from your knowledge base (if configured)?
- Is the response helpful and relevant?
Edit Your Prompt
The prompt (also called “Agent Template”) tells your chat agent how to behave. You can edit it in the Playground to improve responses.Select a prompt template
In the left panel, find the Agent Template (Chat) section. Click the Select Template dropdown to see available prompt templates. Each template has a name and description to help you choose the right one.
View the prompt content
After selecting a template, you’ll see the prompt content in a text editor below. This is the instructions that tell your chat agent how to behave.
Edit the prompt
Click in the text editor and modify the prompt to customize it for your needs. You can:
- Change the chat agent’s role or personality
- Adjust the tone (professional, friendly, casual)
- Add specific instructions about what to do or avoid
- Include examples of good responses
- Reference your knowledge base or products
When you edit a predefined template, the system automatically creates a custom version so you don’t lose the original template.
Preview your prompt (optional)
Click the Preview button to see how your prompt will look when formatted. This helps you check if your prompt is well-structured.
Adjust AI Settings
You can modify AI configuration settings in the Playground to see how they affect responses.Change the AI Model
Find the model setting
In the left panel, look for the Model dropdown in the AI Configuration section.
Select a different model
Click the dropdown and choose a different AI model. Common options include:
- Gemini 2.0 Flash: Fast and efficient, great for most real-time interactions
- gpt-4o-mini: Cost-effective, good for standard use cases
- gpt-4: More powerful, better for complex tasks
Adjust Temperature
Temperature controls how creative or focused your chat agent’s responses are.Set the temperature
Adjust the temperature value:
- Lower values (0-0.3): More focused, consistent, predictable responses
- Higher values (0.7-1.0): More creative, varied, conversational responses
Configure AI Tools/Actions
AI Actions are special capabilities that extend your chat agent beyond basic conversation.Find the AI Actions section
In the left panel, look for the Available Tools & Actions (Chat) section. You’ll see a list of available tools with checkboxes.
Enable tools
Check the boxes next to the tools you want your chat agent to use. Common tools include:
- Knowledge Base Search: Allow the agent to search your uploaded documents to answer questions
- Book Appointment: Schedule appointments (requires Calendly setup)
- Track Shipment: Track shipments (requires Shiprocket setup)
- Human Handover: Transfer conversations to human agents
Some tools require additional setup (like credentials). If you check a tool that needs setup, a modal will appear to guide you through the configuration.
Configure tool credentials (if needed)
If a tool requires credentials:
- A modal will appear when you check the tool
- Follow the instructions to enter your credentials
- The system will validate them before enabling the tool
Save Your Changes
After testing and adjusting your settings, you can save them to your project.Review your changes
Before saving, make sure you’re happy with:
- The prompt content and how it affects responses
- The AI model selection
- The temperature setting
- The enabled tools
The Playground tracks unsaved changes. You’ll see indicators if you have changes that haven’t been saved yet.
Click Save Settings
In the left panel, find the Save Settings button (usually at the bottom of the configuration panel). Click it to save your changes to the project.
Reset Your Session
If you want to start a fresh conversation in the Playground:Find the reset button
Look for a reset or clear button (usually an icon with circular arrows) in the chat interface.
Best Practices
Testing Your Chat Agent
- Test various question types: Ask simple questions, complex questions, and edge cases
- Try different phrasings: See how the chat agent handles the same question asked in different ways
- Test knowledge base integration: If you have knowledge sources, ask questions that should be answered using them
- Check tool functionality: If you’ve enabled tools, test them to ensure they work correctly
- Review tone and style: Make sure responses match your brand voice
Editing Prompts
- Start with templates: Use pre-made templates as a starting point - they’re often better than starting from scratch
- Make small changes: Edit prompts incrementally and test after each change
- Be specific: Clearly describe what your chat agent should do, what tone to use, and what to avoid
- Include examples: Add examples of good responses in your prompt to guide the AI
- Test thoroughly: Always test prompt changes before saving them
Adjusting AI Settings
- Start with defaults: Begin with default settings and adjust based on testing results
- Change one thing at a time: Modify one setting at a time so you can see what each change does
- Document your changes: Note which settings work best for your use case
- Consider costs: More powerful models may cost more, so balance performance with cost
Using Tools
- Only enable what you need: Don’t enable tools you won’t use - they add complexity
- Read tool descriptions: Understand what each tool does before enabling it
- Configure properly: Make sure to complete credential setup for tools that require it
- Test after enabling: Always test tools after enabling them to ensure they work
Troubleshooting
Playground Won't Connect
Playground Won't Connect
Possible reasons and solutions:
- WebSocket connection failed: Refresh the page and try again
- Project not found: Make sure you’re accessing the correct project
- Network issues: Check your internet connection
- Browser issues: Try using a different browser or clearing your browser cache
Chat Agent Not Responding
Chat Agent Not Responding
What to check:
- Verify that the connection status shows “Connected”
- Check if there are any error messages in the chat
- Make sure you’ve saved your prompt and AI settings
- Try refreshing the page and reconnecting
- Check that your project has valid AI configuration
Changes Not Reflecting in Responses
Changes Not Reflecting in Responses
What to do:
- Make sure you’ve clicked “Save Settings” after making changes
- Refresh the page to ensure the latest settings are loaded
- Check that you’re testing with the correct prompt template selected
- Verify that your changes were actually saved (check for success message)
- Try resetting the conversation and asking a new question
Can't Edit Prompt
Can't Edit Prompt
What to check:
- Make sure you have permission to update the project
- Verify that a prompt template is selected
- Try selecting a different template and then editing it
- Check if there are any error messages in the browser console
- Refresh the page and try again
Tools Not Working
Tools Not Working
What to do:
- Verify that tool credentials are configured correctly
- Check that the tool is actually enabled (checkbox is checked)
- Test the tool with a specific request (e.g., “Book an appointment”)
- Review the tool’s description to understand what it does
- Check if there are any error messages when using the tool
Can't Save Settings
Can't Save Settings
What to check:
- Make sure you have permission to update the project
- Verify that you’ve made actual changes (not just viewing settings)
- Check your internet connection
- Look for any error messages
- Try refreshing the page and saving again
Tips for Success
Iterative Testing
- Test, edit, test again - make small changes and test frequently
- Keep a record of what works and what doesn’t
- Compare responses before and after changes
- Ask team members to test and provide feedback
Prompt Engineering
- Be clear and specific in your instructions
- Define the chat agent’s role and personality
- Set boundaries (what it should and shouldn’t do)
- Provide context about your business or products
- Include examples of good responses
Performance Optimization
- Start with simpler settings and increase complexity as needed
- Monitor response quality vs. cost (especially with different models)
- Test temperature settings to find the right balance
- Only enable tools that add real value
Collaboration
- Share your Playground session with team members for feedback
- Document successful prompt configurations
- Keep notes on what settings work best for different use cases
- Use the Playground to demonstrate chat agent capabilities to stakeholders
Summary
Using the Playground involves:- Access the Playground from your project
- Test your chat agent by having conversations
- Edit prompts to improve responses
- Adjust AI settings (model, temperature, tools)
- Test changes in real-time
- Save your changes when satisfied
Quick Reference
Playground Features:- Real-time chat testing
- Prompt editing and customization
- AI model and temperature adjustment
- Tool/Action configuration
- Save changes to project
- Test: Ask questions in the chat interface
- Edit: Modify prompts in the text editor
- Adjust: Change AI settings in the configuration panel
- Save: Click “Save Settings” to apply changes